 Save
Save I still remember the first time I created a dessert platter like this—it was for my sister's engagement party, and I was terrified that my presentation skills would fall short of her elegant vision. But as I arranged those vibrant fruits and gleaming chocolates in symmetrical patterns across a marble board, something magical happened. The kitchen filled with anticipation, and when guests walked into the room, their eyes lit up like they'd discovered edible art. That's when I learned that a dessert platter isn't just about taste; it's about creating a moment of pure joy that lingers long after the last bite.
I'll never forget assembling one of these platters for a dinner party where my perfectionist friend was coming—the one who notices everything. As I carefully mirrored the strawberries and macarons on opposite sides, creating that perfect balance, she walked in early and caught me mid-arrangement. Instead of criticizing, she grabbed a small bowl and helped me position the kiwis, and we laughed about how therapeutic the whole process felt. That night, her comment wasn't about the taste—it was that the platter made her feel celebrated, like someone had taken real care to make her meal special.
Ingredients
- Strawberries, 1 cup halved: Fresh strawberries bring bright color and natural sweetness that balances the richness of chocolate. Always buy them a day before and store them at room temperature until serving—cold berries taste muted, but room-temperature ones burst with flavor
- Blueberries, 1 cup: These tiny gems hold their shape beautifully and add a tart sophistication. Keep them whole for maximum visual impact and easy eating
- Raspberries, 1 cup: Delicate and jewel-like, raspberries deserve a gentle touch. Add them last, right before serving, to prevent them from weeping juice onto neighboring items
- Kiwis, 2 peeled and sliced: The vivid green color is irreplaceable on a platter. Slice them at a slight angle for elegance, and do this no more than two hours ahead or they'll oxidize and lose their bright hue
- Mango, 1 peeled and cubed: Ripe mango adds a tropical sweetness and golden warmth. Choose one that yields slightly to gentle pressure—overripe mangoes become mushy when handled
- Assorted truffles, 1 cup: These are your visual anchors and flavor jewels. Arrange them in small clusters rather than scattering them randomly; the grouping makes the board feel intentional
- Chocolate-covered almonds, 1 cup: The crunch is essential, offering texture contrast to soft fruits and creamy chocolates. Choose ones with a thin chocolate shell so the almond flavor shines through
- Mini brownies or brownie bites, 1 cup: Homemade brownies work beautifully, but store-bought ones save time without sacrificing the moment. Arrange them in a neat row for visual rhythm
- Assorted macarons, 1 cup: These delicate pastries are pure elegance. Keep them in a cool spot and add them to the board no more than 30 minutes before serving, or they'll soften from fruit moisture
- Shortbread or butter cookies, 1 cup: Classic cookies provide familiar comfort and fill visual gaps. Their neutral color lets other elements shine
- Dark chocolate chips, 1 cup (for melting): Choose quality chocolate—it melts smoothly and tastes noticeably better than cheap varieties. The dark drizzle creates the most dramatic visual effect
- White chocolate chips, 1/2 cup (for melting): White chocolate burns easily, so watch it carefully during melting. Its sweetness and pale color provide beautiful contrast to dark chocolate
- Chopped pistachios, 2 tablespoons: Beyond flavor, the pale green color adds another dimension. Toast them lightly if you want deeper flavor, though the raw version looks fresher
- Dried rose petals, 2 tablespoons (optional): These add an unexpected elegance and a whisper of floral sophistication. They're entirely optional but transform the platter into something truly special
- Fresh mint leaves, for garnish: A few strategically placed mint leaves signal freshness and complete the garden-to-table feeling. Add them literally at the last moment before serving
Tired of Takeout? 🥡
Get 10 meals you can make faster than delivery arrives. Seriously.
One email. No spam. Unsubscribe anytime.
Instructions
- Set your stage:
- Choose your canvas—a large wooden board, a marble platter, or even a white serving tray. The surface matters because it frames everything arranged on it. Take a moment to visualize where you want each element before you start; this is your only chance to plan without sticky fingers getting in the way
- Prepare your fruits with intention:
- Wash and thoroughly dry every berry and fruit under cool water, then pat them gently with paper towels. Wetness is the enemy of a beautiful presentation—it creates dark spots and makes everything look tired. Slice the strawberries in half lengthwise to show off their rosy interiors, peel and slice the kiwis at a slight diagonal for elegance, and cube the mango with care. Keep the blueberries and raspberries whole; their perfect shape is part of their charm
- Melt your chocolate like you mean it:
- Pour the dark chocolate chips into one microwave-safe bowl and the white chocolate chips into another. Heat each in 30-second bursts, stirring between each interval. This gentle approach prevents seizing, which happens when chocolate gets too hot and becomes grainy and unusable. The chocolate should be perfectly smooth and glossy, like liquid silk, when you're done
- Create your foundation with fruits:
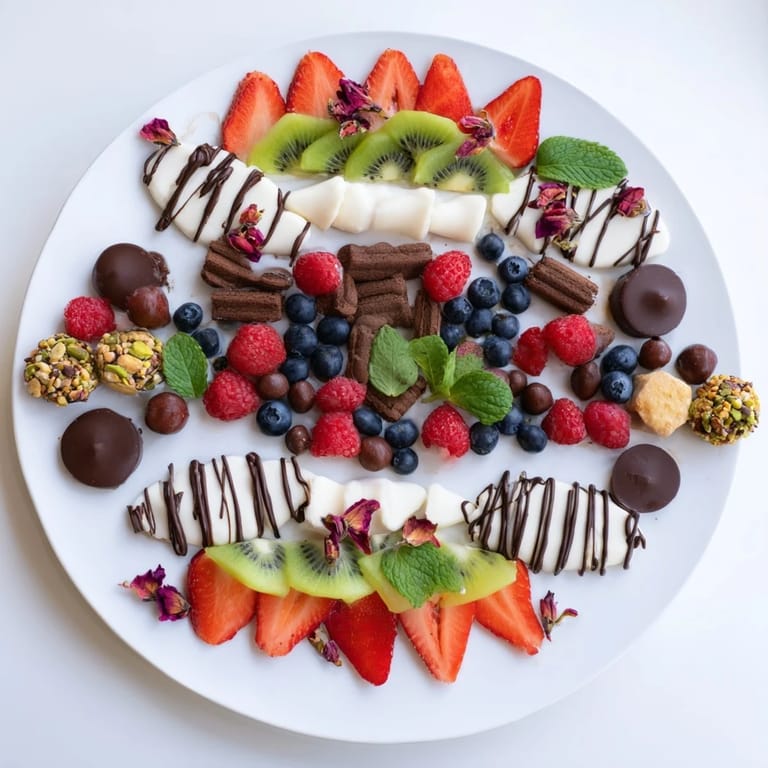
- This is where symmetry becomes your best friend. Start by arranging the fruit on opposite sides of the board in mirrored patterns. Picture an invisible line down the center, and what you place on the left, mirror on the right. Layer the strawberries along one edge, then create a band of kiwis, then blueberries. This structured approach prevents the chaotic look and ensures visual balance
- Fill the middle with chocolates and sweets:
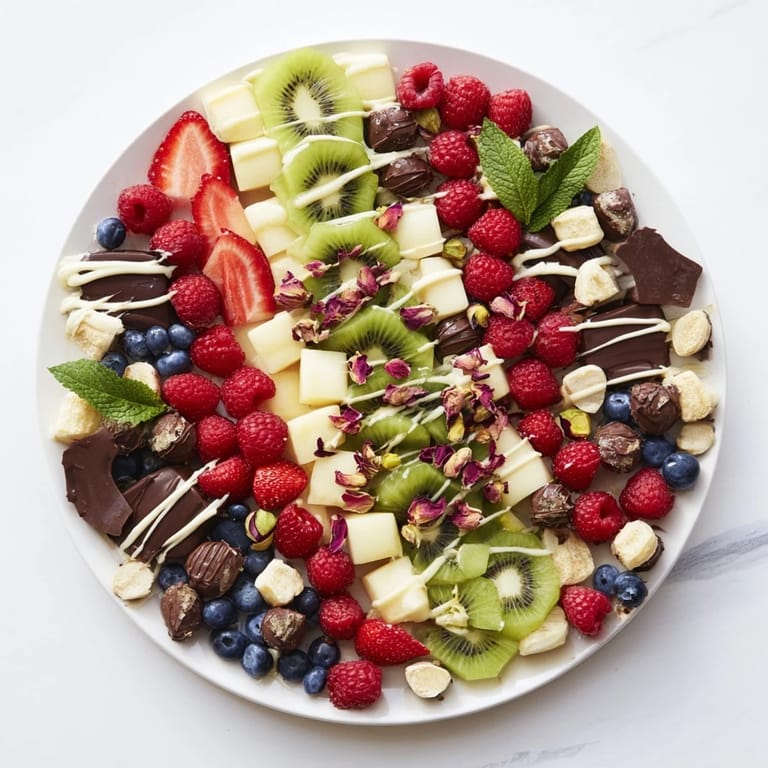
- Now comes the satisfying part—building on your fruit foundation with truffles, brownies, macarons, and cookies. Arrange them in neat rows or circles, alternating types so no two chocolate items sit directly next to each other. Think of it like composing a still life where every element has its place and purpose. Stand back periodically to check that the board still feels balanced
- Fill the final gaps with intention:
- Use cookies, chocolate-covered almonds, and any remaining sweets to complete the picture, filling empty spaces without crowding. Leave some breathing room—a platter that looks cluttered loses its elegance. Every element should feel placed, not scattered
- Drizzle with artistry:
- Using a spoon or piping bag, create decorative lines or delicate swirls with your melted chocolate. If using a spoon, dip it in the chocolate and let it flow off in thin, controlled strands. If using a piping bag, work slowly and steadily. The drizzle is your signature flourish, so take your time and let it feel intentional. Some people do straight lines, others prefer organic swirls—there's no wrong way, only your way
- Add the final touches:
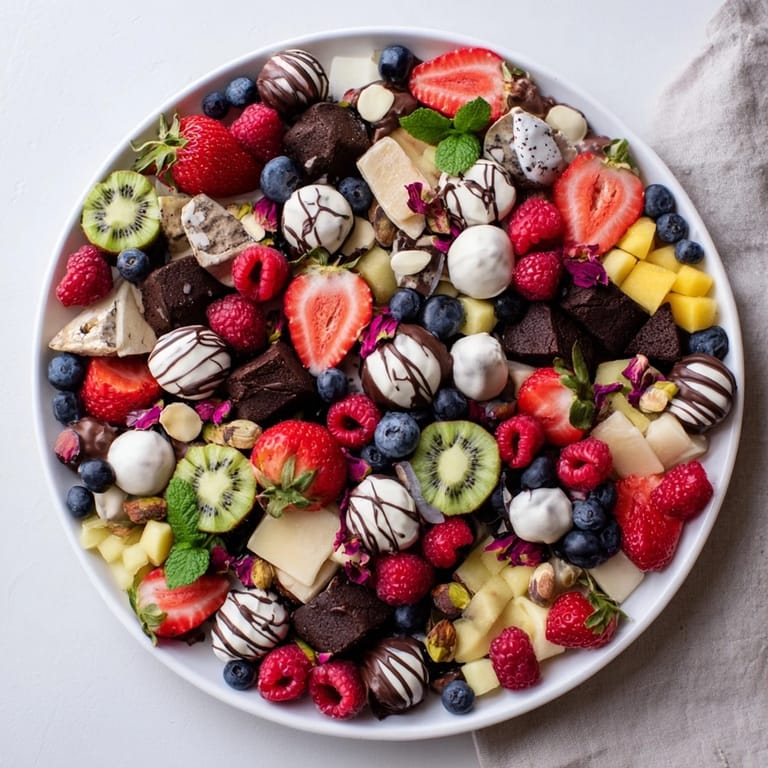
- Sprinkle chopped pistachios and dried rose petals (if using) across the platter with a light hand. These garnishes add color, texture, and sophistication. Then, just before serving, tuck fresh mint leaves into a few strategic spots. The green looks fresh and alive, and it signals that this platter was prepared with care
 Save
Save I once made this platter for a family gathering where my grandmother—who rarely praised anything I cooked—walked over, studied it in silence for a long moment, then simply said, 'This is beautiful.' She didn't need to say it tasted good; the visual beauty had already communicated love. That's when I understood that a dessert platter is a love language all its own.
The Art of Symmetry and Balance
Creating visual balance on a platter is easier than you might think—it's really just about thinking in mirror images and groupings. When you arrange fruits and sweets in pairs or matching patterns across an invisible center line, your eye automatically perceives harmony. The human brain is wired to find comfort in symmetry, so even if you're not naturally artistic, leaning on this principle makes everything look intentional and curated. I learned this the hard way after my first platter looked scattered and chaotic. A friend suggested I flip my perspective—instead of trying to fill every space, I should arrange in sections, almost like room design. Suddenly it made sense.
Chocolate Melting Mastery
The difference between smooth, glossy chocolate and grainy, broken chocolate comes down to patience and temperature control. Many people overheat chocolate because they think faster melting is better melting—it's the opposite. Working in 30-second microwave intervals gives you total control and prevents the overheating that causes chocolate to seize and become unusable. I also learned that it's worth investing in quality chocolate chips. Cheap chocolate melts differently and tastes noticeably waxy. Splurging on decent chocolate transforms the final platter from good-enough to genuinely delicious.
Timing, Storage, and Serving Success
The platter can be assembled up to two hours before serving, but the moment matters more than you'd think. Room-temperature fruit tastes brighter and juicier than cold fruit, and berries held at room temperature remain plump and glossy. The macarons and brownies should also be kept at room temperature so they don't taste hard or cold. Refrigerate the completed platter only if you absolutely must—chill takes the edge off flavors and can make delicate pastries absorb moisture from the fruits. If you're serving this at a special event, arrange it 30 to 60 minutes before guests arrive, then add the fresh mint and any perishable garnishes just before the big reveal.
- Use a large board or platter—crowding everything into a small space makes it look cluttered instead of curated
- Keep backup elements nearby in case something wilts or a guest eats a chocolate—simple restocking keeps the board looking full
- Have small serving utensils or small forks nearby so guests can take pieces without their fingers touching the whole platter
 Save
Save A dessert platter is permission to stop thinking of dessert as something you have to bake or cook—it's something you can compose, arrange, and present with pride. Every time you make one, you get better at reading the board and trusting your instincts about balance and beauty.
Common Questions
- → How do I achieve the symmetrical arrangement?
Start by laying out fruits and sweets in mirrored patterns on opposite sides of the serving board to create balance and visual appeal.
- → What is the best way to melt the chocolates?
Use a microwave or double boiler, heating in short intervals of 30 seconds and stirring frequently to avoid burning.
- → Can I substitute the pistachios if allergic?
Yes, you can omit pistachios or replace them with other nuts or seeds, or leave them out entirely for nut allergies.
- → How should I prepare the fruits for this platter?
Wash and dry all fruits well; slice strawberries, kiwis, and mango neatly, while keeping berries whole for texture variety.
- → What garnishes enhance the flavor and look?
Sprinkle chopped pistachios, dried rose petals, and fresh mint leaves to add color, texture, and freshness.
- → Any tips for making this gluten-free?
Swap regular cookies and brownies with gluten-free alternatives to maintain the structure and maintain diet needs.