 Save
Save I still remember the first time I served a proper pickled vegetable platter—it was at a small summer dinner party, and I'd stayed up late the night before arranging those jewel-toned vegetables in perfect lines across a wooden board. A guest asked if I'd bought it from some fancy market, and something about that moment made me realize how much joy comes from creating something beautiful and tangy with your own hands. That night, I learned that fermented and pickled vegetables aren't just condiments; they're little flavor bombs that can completely transform a meal.
I've made this platter countless times now, but the memory that sticks with me is bringing it to a potluck where everyone else brought the same heavy, cooked dishes. People kept coming back to this board, adding a little of this and that to their plates, and I watched someone take a bite of the fermented sauerkraut and close their eyes like they'd tasted something transcendent. That's when I understood: this dish is about sharing brightness and tang in a world that sometimes feels too heavy.
Ingredients
- Carrots, julienned: Their natural sweetness becomes even more pronounced when pickled, and I've learned that cutting them into thin matchsticks lets the brine penetrate faster, giving you that perfect tender-crisp texture by the next morning
- Cucumber, sliced: Keep them crisp by pickling them quickly; if you leave them too long, they become soft, which honestly isn't terrible but loses that satisfying snap
- Radishes, thinly sliced: These are where the magic happens—their peppery bite mellows just slightly while staying bold, and they bleed this gorgeous pink into everything around them
- Red cabbage, shredded: This is your visual anchor; those deep purple strands will turn everything around them a beautiful rosy hue, almost like edible watercolor
- Cauliflower florets: Small, tender florets work best; they soften just enough to be pleasant but stay firm enough to grab with your fork
- Green beans, trimmed: A texture contrast that keeps things interesting, and they stay vibrant green if you don't cook them first—raw is the way here
- White vinegar: Clean, classic, lets the vegetables shine without overpowering them with its own story
- Water: Dilutes the vinegar to prevent it from being harsh; this balance is essential
- Sugar and kosher salt: These dissolve into the brine and create the perfect balance of salty, slightly sweet, and deeply sour that makes you crave another bite
- Garlic cloves, sliced: Their harsh edges soften into something almost sweet and mellow after a day in the brine
- Mustard seeds and coriander seeds: These won't bloom like they would if you toasted them, but they'll slowly infuse a subtle warmth throughout the liquid
- Black peppercorns, bay leaves, and fresh dill: Aromatics that float through the whole experience, adding complexity without announcing themselves too loudly
- Fresh red chili: Optional, but if you add it, that gentle heat becomes a persistent friend in the background, warming each bite
Tired of Takeout? 🥡
Get 10 meals you can make faster than delivery arrives. Seriously.
One email. No spam. Unsubscribe anytime.
Instructions
- Wash and prepare your vegetables like you're about to paint with them:
- Get everything clean and cut according to the measurements. I like to lay them all out on my cutting board before I start cooking, just to admire the colors for a moment and make sure I haven't forgotten anything. Take your time with the julienning—those thin carrot strands should be uniform, which helps them pickle evenly and looks stunning when arranged.
- Wake up your brine by bringing it to a boil:
- In a saucepan, combine the vinegar, water, sugar, and salt. Stir frequently as it comes to a boil, watching the sugar and salt dissolve completely. The brine should smell sharply of vinegar at first, but that smell will mellow as it cools. Once it's boiling, remove it from heat and let it sit for a few minutes—you want it warm but not so hot that it shocks delicate vegetables.
- Pack your jars like you're building something precious:
- Use clean glass jars or small bowls. This is where the art happens—group your vegetables by color and shape. Stack those radish slices together, keep your carrot sticks in one section, cluster the green beans. Think of it like you're creating a landscape. Pack them tightly enough that they hold their shape but not so tight that the brine can't flow between them.
- Scatter aromatics like you're seasoning a single perfect bite:
- Distribute the garlic slices, mustard seeds, coriander seeds, peppercorns, bay leaves, dill sprigs, and chili evenly among your jars. Some will float, some will sink—let them find their own way.
- Pour the brine while it's still warm:
- Carefully pour the brine over everything, making sure every vegetable is fully submerged. Any bits poking above the surface can grow mold, so be generous with the pouring. The brine should have that sharp vinegar smell now, almost aggressive, but trust the process.
- Let time do the heavy lifting:
- Seal your jars and let them cool completely to room temperature on the counter. Once cooled, move them to the refrigerator. Mark the jars with the date if you're someone who forgets when things were made (I am). Wait at least 12 hours before tasting, but honestly, 24 hours is when everything really comes together. At 48 hours, the flavors have deepened and the textures have softened slightly into something more refined.
- If you want to try true fermentation:
- Make a simpler brine with just 2% salt and water, pack your vegetables, keep them at room temperature away from direct sunlight, and check them daily. You'll see bubbles rising, which means the wild yeasts are doing their work. Taste daily after day three or four, and move them to the fridge when they taste right to you—usually around day five or six.
- Arrange for the final presentation:
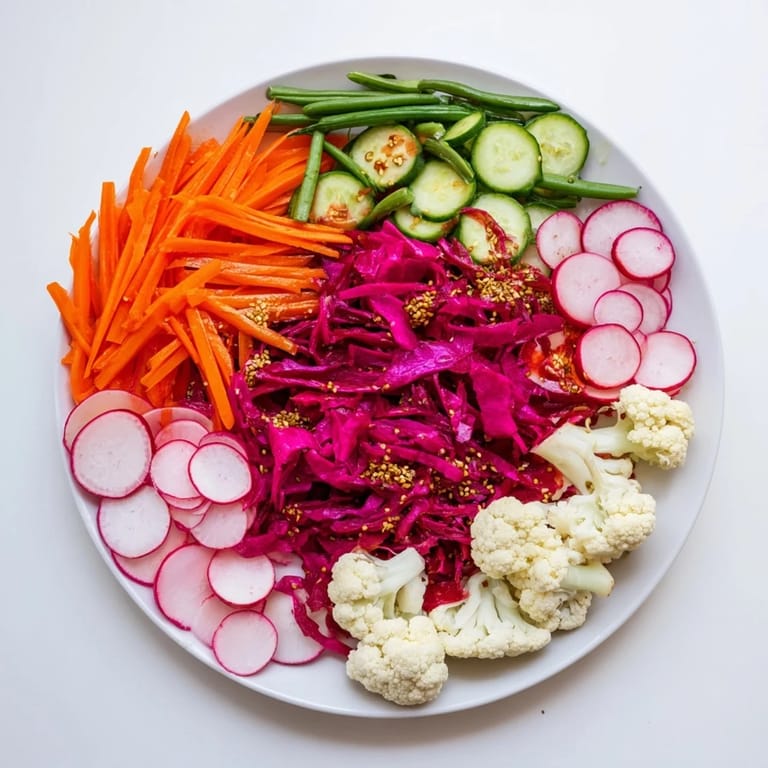
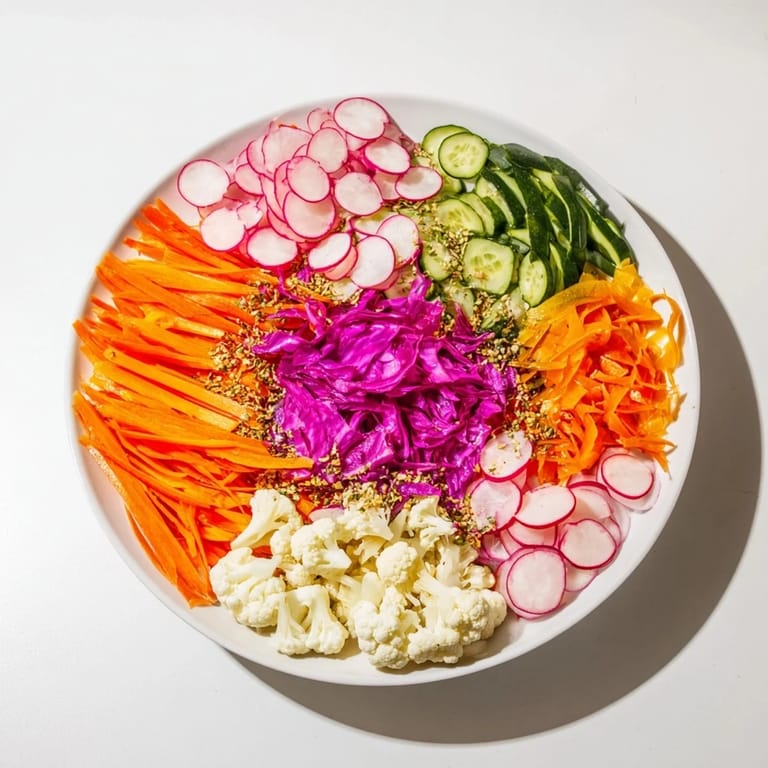
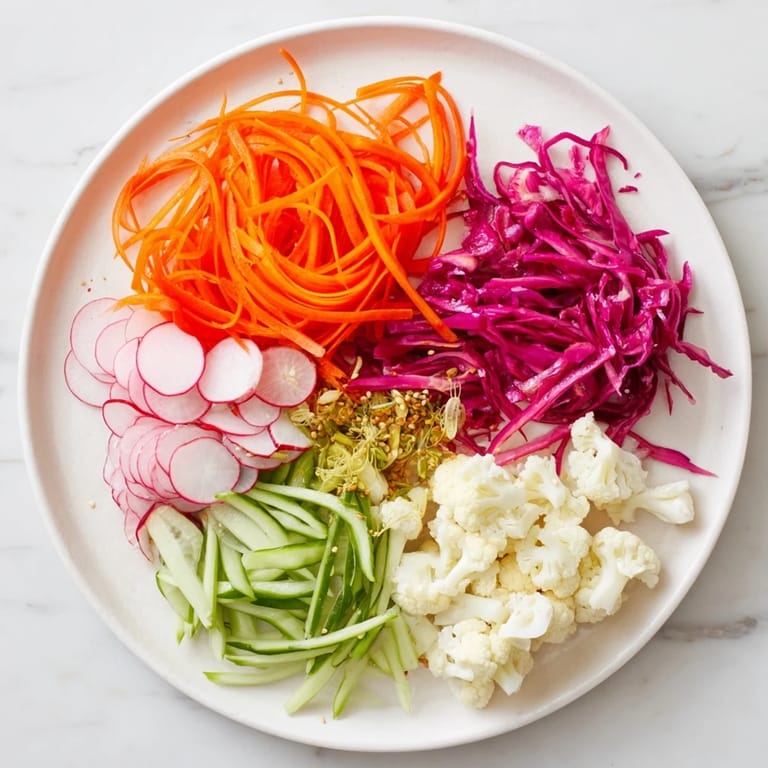
- When you're ready to serve, arrange your pickled and fermented vegetables on a board or serving tray. Keep them organized in those beautiful lines or grids. Add some of the fermented kimchi and sauerkraut if you're using them, scattered among the pickles. The visual impact is half the pleasure here.
 Save
Save There was a winter when my partner came home exhausted from work, and I had this platter waiting in the fridge—something I'd made almost absentmindedly on a Sunday. They opened the fridge, saw all those colors, grabbed a fork, and just stood there eating quietly, and I realized that sometimes the most nourishing thing you can offer isn't a full meal but a moment of brightness, a reminder that food can be joyful and alive and worth savoring slowly.
Why Fermentation Changes Everything
I spent years just quick-pickling vegetables without understanding fermentation, and then someone handed me a jar of homemade sauerkraut that tasted like nothing I'd ever experienced. The difference is that fermentation creates probiotics and develops a complexity of flavor that quick pickling, for all its immediate gratification, simply can't match. Fermented vegetables are alive in a way—the wild yeasts and bacteria are literally transforming the vegetables, and you get to watch and taste that transformation. It's slower, it requires patience and attention, but it's worth it.
The Art of Arranging Your Platter
I've learned that the presentation isn't just about making things look pretty, though that's certainly part of it. When you arrange vegetables thoughtfully, you're actually making them more enjoyable to eat. People will reach for what's nearest, so grouping similar colors and textures together makes each bite more intentional. A linear arrangement feels modern and clean; a grid feels more structured and composed. I find myself creating new patterns each time because the arrangement becomes a small meditation, a moment of quiet before the chaos of serving.
- Start with your most vibrant colors—the red cabbage and radishes—as anchors that draw the eye
- Build around them with the greens and oranges, creating visual rhythm and balance
- Leave small gaps between sections so each vegetable gets its moment of visibility
Flavor Variations to Explore
Once you understand the basic formula, the variations become endless. I've done this with rice vinegar for a subtly sweet Asian-inspired version, with apple cider vinegar for something earthier and more rustic, and with added star anise and Sichuan peppercorns for something that tastes like a completely different dish. Fresh herbs beyond dill—cilantro, tarragon, even mint—change the whole narrative. Sometimes I add thin slices of ginger or a strip of citrus zest just to see where it takes me. This recipe is less a prescription and more a foundation for experimenting.
- Rice vinegar gives a gentler, slightly sweet flavor that works beautifully with Asian-inspired additions
- Apple cider vinegar brings earthiness and warmth, perfect for fall entertaining
- Adding lemongrass, ginger, or Thai chilies transforms this into something completely different
 Save
Save This platter has become my answer to the question of what to bring, what to serve, what to make when I want to feel connected to my kitchen and to the people I'm feeding. There's something grounding about making food that gets better with time, that you can prepare ahead and serve with pride.
Common Questions
- → How long should the vegetables be pickled?
Quick pickled vegetables typically need at least 12 hours in the refrigerator for flavors to develop, but up to 48 hours enhances the taste.
- → Can the vegetables be fermented instead of quick pickled?
Yes, fermenting vegetables involves submerging them in a salt brine and allowing them to ferment at room temperature for 5–7 days for a deeper tang.
- → What spices are used for flavoring?
Mustard seeds, coriander seeds, black peppercorns, bay leaves, dill, garlic, and optional chili slices add aromatic complexity to the vegetables.
- → Which vegetables are best for this platter?
Carrots, cucumbers, radishes, red cabbage, cauliflower, and green beans work well, but seasonal options like beets or turnips can be included.
- → How should the platter be presented?
Arrange the pickled and fermented vegetables in tidy linear or grid patterns on a serving board or tray for an appealing visual effect.
- → Are there any pairing suggestions?
The platter pairs beautifully with crusty bread, cured meats, vegan cheeses, and crisp wines like Riesling or dry rosé.