 Save
Save My cousin called me three weeks before her daughter's graduation with a kind of panic in her voice—she needed something celebratory but couldn't spend hours in the kitchen. We landed on these cookie bars almost by accident, really, while she described wanting something that felt special enough for photos but easy enough to make while helping with party decorations. The first batch came out of my oven golden and studded with those colorful candies, and suddenly I understood why she'd sounded relieved. These bars are the kind of dessert that looks like you fussed over it for days, when honestly you spent maybe forty minutes total.
I made a triple batch for my neighborhood's block party last summer, and watching kids' faces light up when they recognized their school colors in the bars was the kind of moment that makes baking worth the cleanup. One little girl asked if I'd made them specifically for her, and I said yes because in a way, I had—for all of them. That's when I realized these bars are less about the recipe and more about giving people permission to celebrate, even in small ways.
Ingredients
- All-purpose flour: Two and a quarter cups gives you structure without being dense, and it's forgiving enough that you don't need to worry about overmixing if you're distracted by party planning.
- Baking soda: One teaspoon is your secret to that tender, almost brownie-like crumb that keeps people reaching for another bar.
- Salt: Half a teaspoon cuts through the sweetness and makes everything taste more intentional.
- Unsalted butter: One cup melted and cooled slightly creates that rich, buttery flavor without being greasy; melting it first means less mixing work.
- Brown sugar and granulated sugar: The combination of one cup brown and half cup granulated gives you deep molasses notes with a hint of crisp texture.
- Eggs: Two large eggs bind everything together while keeping the bars soft and chewy rather than cake-like.
- Vanilla extract: Two teaspoons of pure vanilla makes people ask what your secret ingredient is.
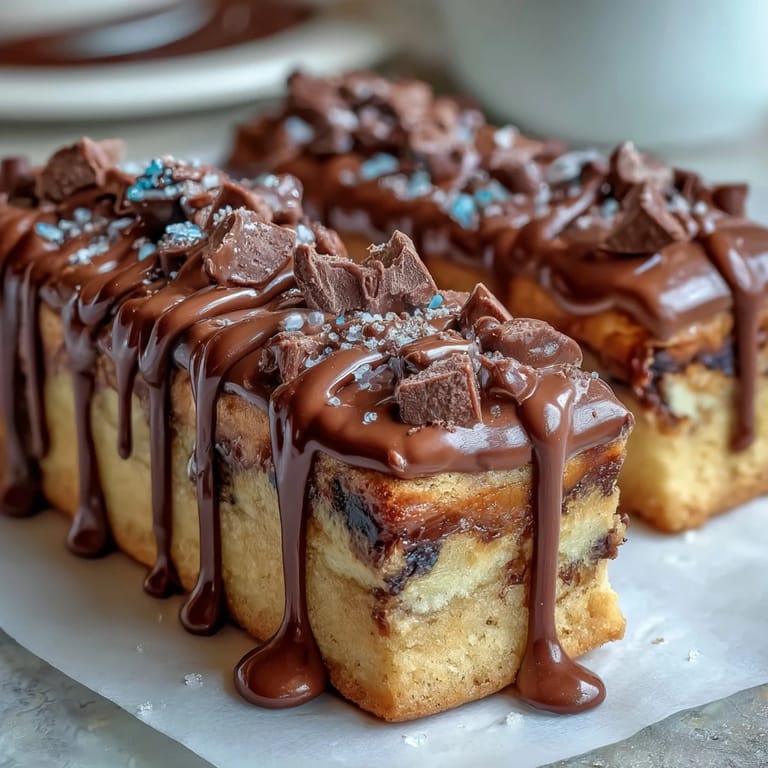
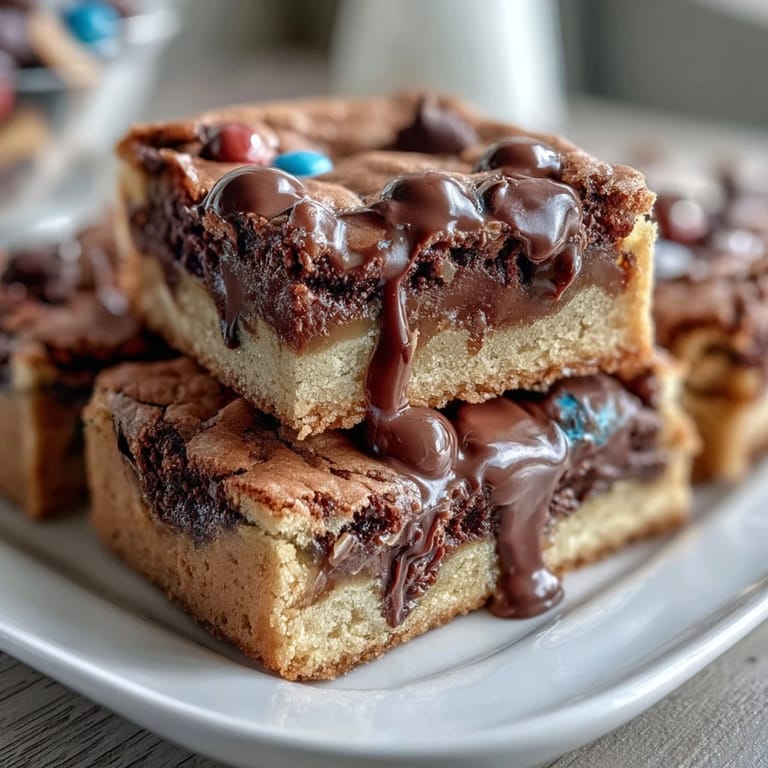
- Semi-sweet chocolate chips: One cup of these classics refuses to disappoint, melting just enough to stay chunky.
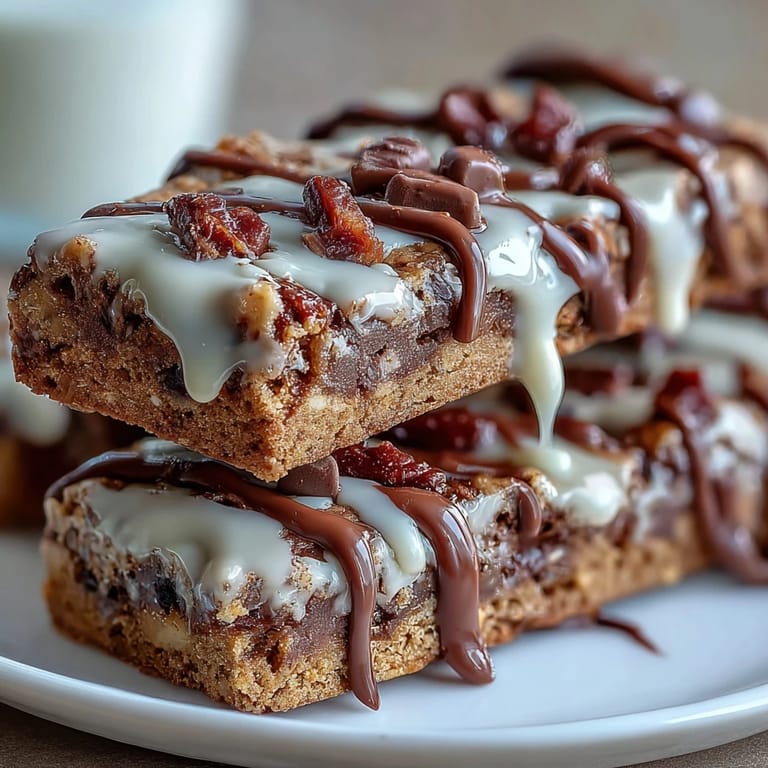
- Colored candy-coated chocolates: Half a cup of these (think school colors) is where the celebration actually happens—they stay intact and look festive without overpowering the chocolate flavor.
- White chocolate: Four ounces chopped or in chip form creates that elegant drizzle that makes these feel bakery-worthy.
- Vegetable oil: One teaspoon mixed with the white chocolate keeps it thin and drizzle-able without seizing up.
Tired of Takeout? 🥡
Get 10 meals you can make faster than delivery arrives. Seriously.
One email. No spam. Unsubscribe anytime.
Instructions
- Set your stage:
- Preheat your oven to 350°F and line a 9x13-inch pan with parchment paper, letting it overhang the sides—this is the small move that makes removing and cutting the bars later feel effortless. You'll thank yourself when you're not wrestling sticky bars out of a pan.
- Combine your dry team:
- Whisk flour, baking soda, and salt in a medium bowl and set it aside, which takes thirty seconds but prevents lumps from sneaking into your final bars. This is the kind of small step that separates good bars from great ones.
- Build your wet base:
- In a large bowl, whisk the melted butter with both sugars until the mixture looks smooth and slightly granular, then add your eggs and vanilla and mix until everything is well combined. You want this stage to look almost like thick frosting before you add the flour.
- Marry everything together:
- Fold the dry ingredients into the wet mixture gently—this is where restraint matters, because overmixing develops gluten and turns bars tough instead of chewy. Stop as soon as you don't see flour streaks anymore.
- Add your celebratory bits:
- Stir in the chocolate chips and colorful candies until they're evenly distributed throughout the dough. The candies should look like little jewels scattered through the mixture.
- Spread and bake:
- Pour the dough into your prepared pan and spread it evenly using a spatula, then bake for 23 to 25 minutes until the edges turn lightly golden and a toothpick inserted in the center comes out mostly clean. The center should still look slightly underbaked—it'll continue cooking as it cools and stay wonderfully chewy.
- Cool with patience:
- Let the bars cool completely in the pan on a wire rack, which usually takes about an hour if you're not in a hurry. Cutting them while warm will turn them into crumbs instead of bars.
- Drizzle with elegance:
- Once completely cool, melt your white chocolate with vegetable oil in a microwave-safe bowl using 20-second increments and stirring between each round until it's smooth and glossy. Drizzle it over the cooled bars using a spoon or piping bag for that professional finish.
- Add your final flourish:
- Sprinkle any additional sprinkles or candies over the drizzle while it's still slightly wet so they stick, then let everything set at room temperature for about fifteen minutes. You can speed this up in the refrigerator if you're short on time.
- Cut and celebrate:
- Once the drizzle is fully set, use the parchment overhang to lift the entire sheet out of the pan and cut into sixteen squares using a sharp knife. Wiping your knife clean between cuts keeps the edges looking neat and prevents chocolate smudging.
 Save
Save My friend Sarah brought these bars to her daughter's graduation open house last year, and she told me later that three different people asked for the recipe before anyone even finished eating the first bars. That moment when a simple dessert becomes the thing people remember most about the party is rare and worth celebrating.
Customizing for Your Celebration
The beauty of these bars is that they're a blank canvas for whatever you're celebrating. If you're making them for a school event, use the school colors in your candies and sprinkles—this creates an instant sense of occasion without any extra effort on your part. I've made them with purple and gold for one graduation, navy and white for another, and once in rainbow colors for a general party that just needed joy. The white chocolate drizzle stays neutral and elegant no matter what colors you choose, which means your bars always look intentional and special.
Storage and Make-Ahead Magic
These bars actually improve after a day or two, as the flavors meld and the texture becomes even more tender. Store them in an airtight container at room temperature for up to four days, or wrap them individually in plastic wrap and freeze them for up to two weeks if you're making them ahead for a big event. I've learned the hard way that assembling a party-ready dessert table the morning of is stressful, so baking these bars two or three days early and letting them sit in a tin actually reduces my anxiety instead of adding to it.
Flavor Swaps and Creative Variations
Once you understand the basic structure of these bars, you can play with the mix-ins without changing the outcome. Swap the semi-sweet chocolate chips for dark chocolate if you want more sophistication, or use milk chocolate for something sweeter and creamier. You could even skip one of the chocolate varieties entirely and replace it with crushed cookies, toffee bits, or white chocolate chunks if you're feeling adventurous—the bars will stay just as chewy and delicious.
- Brown butter instead of regular melted butter adds a toasted, almost nutty depth that makes people pause and ask what's different.
- A tiny pinch of cinnamon or espresso powder in the dry ingredients creates subtle complexity without tasting like those flavors took over.
- Using half the white chocolate for drizzling and stirring the other half into the dough itself creates pockets of sweetness throughout.
 Save
Save These bars have become my go-to for any moment worth marking—graduations, promotions, first-day-of-school celebrations, or just because someone deserves a little joy on a random Thursday. They're forgiving, celebratory, and somehow always exactly right.
Common Questions
- → What type of chocolate works best for the drizzle?
White chocolate chips or chopped white chocolate melted with a bit of vegetable oil create a smooth, glossy drizzle that hardens nicely.
- → Can I substitute the candy-coated chocolates?
Yes, you can replace them with other colorful candies or additional chocolate chips to suit your preference or theme.
- → How can I prevent the bars from drying out?
Store the bars in an airtight container at room temperature to keep them moist and chewy for up to four days.
- → What is the best way to mix wet and dry ingredients?
Gently fold the dry ingredients into the wet mixture until just combined to maintain a tender texture without overmixing.
- → Can these bars be made ahead of time?
Yes, they can be baked in advance and drizzled just before serving to keep the drizzle fresh and glossy.